Atomic structure and Heat
Atoms are the basic structure or building block of all matter. Atoms are made up of protons, neutrons, and electrons. Protons are positive, neutrons are neutral, and electrons are negative. This means that the nucleus which is made up of protons and neutrons, and the electrons circle that nucleus (which you can see in the picture at right). They are incredibly small. For example, an average sized person has 7 billion billion atoms, or 7 followed by 27 0's. Atoms bond together to form molecules. Molecules make up different objects (ie. H2O is water). Compounds are molecules made of different elements (ie. CO2). Without these atoms and molecules, there would be nothing, literally. They make up everything we know and love.
When solids, liquids, and gasses are hot, the atoms and molecules vibrate faster. They rub together which creates friction, which creates heat. when something is hot, the object expands, but the mass remains the same. When something cools, the atoms and molecules vinrate slower, and it goes back to it's normal size.
When solids, liquids, and gasses are hot, the atoms and molecules vibrate faster. They rub together which creates friction, which creates heat. when something is hot, the object expands, but the mass remains the same. When something cools, the atoms and molecules vinrate slower, and it goes back to it's normal size.
Sun Angles
|
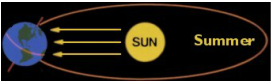
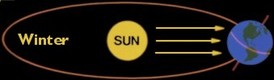
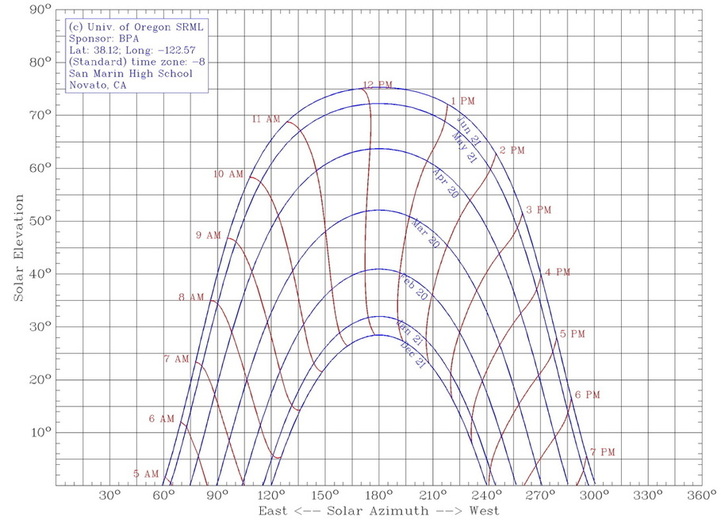
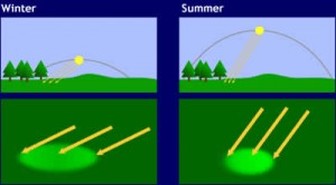
The sun is essential to human life. It provides us with warmth and energy. During the Winter, the sun is lower in the sky, rises later, and sets earlier. This means that the days are generally shorter. During the Summer, the sun reaches higher in the sky, sets earlier, and sets later. This means that the days are generally longer. Why does this happen though? It all has to do with the tilt of the Earth. It is always tilted at a 23.5 degree angle. As it orbits around the sun, the Northern Hemisphere will be tilted toward the sun at one point (Summer) and tilted away from the sun at another point (Winter). You can see images of what that looks like at right. The image below are the sun's angles at San Marin Highschool where we were doing our project. It is what we based our information on when studying how to build a shade structure.
|
|
|
We also studied why it is hotter in the summer and colder in the winter. After conducting a lab, we concluded that: it is hotter in the Summer because that is when sun's rays are most direct on the Northern Hemisphere. The Earth is tilted in a way that the sun's rays can directly hit it. During the Winter, the Northern Hemisphere is tilted away from the sun, so the sun's rays are spread out wider along the surface of the Northern Hemisphere. You can see how this works in the picture at right.
|
|
Solar Hot Water Heater
Using the information about the molecules, atoms, heat, and sun angles, we were given the task of creating a solar hot water heater. Since our class was at around 8:00-10:00, we used the sun angles graph of San Marin Highschool to determin what angle the sun would be at. Because it was in the winter (close to January 21), we determined that the sun could be anywhere between 6 degrees to 23 degrees. Now we knew what angle to have our light reflectors at.
For our design, we first curved a peice of cardboard into a parabolic shape, and covered it in reflective material. We placed that in a cardboard box. We placed a copper pipe onto the prabola. The pipe was connected on both ends by plastic tubing. One side of tubing had a funnel on the end where we poured the water in. The other side of tubing was attached to a bottle where the hot water was stored. The water would theoretically run through the pipe at a slow enough pace that it would heat up by the time it reached the bottle. Unfortunately due to an incorrect placement of the copper pipe, the water did not heat up properly, and remained the same temperature we started at. If we had changed the height that the pipe sat at, the water would have heated up properly.
For our design, we first curved a peice of cardboard into a parabolic shape, and covered it in reflective material. We placed that in a cardboard box. We placed a copper pipe onto the prabola. The pipe was connected on both ends by plastic tubing. One side of tubing had a funnel on the end where we poured the water in. The other side of tubing was attached to a bottle where the hot water was stored. The water would theoretically run through the pipe at a slow enough pace that it would heat up by the time it reached the bottle. Unfortunately due to an incorrect placement of the copper pipe, the water did not heat up properly, and remained the same temperature we started at. If we had changed the height that the pipe sat at, the water would have heated up properly.
Laws of Thermodynamics
There are four laws of thermodynamics. The zeroeth law, the first law, the second law, and the third law.
0th law: explains temperature- if two systems are in thermal equillibrium with a third system, they are in equillibrium with each other.
1st law: conservation of energy- energy is neither ccreated nor destroyed, but transfered from one another. Heat is a form of energy.
2nd law: entropy increases- disorder increases- over time everything becomes the same temperature.
3rd: temperature can never get to absolute zero. Heat always exists.
Wind Turbine Lab
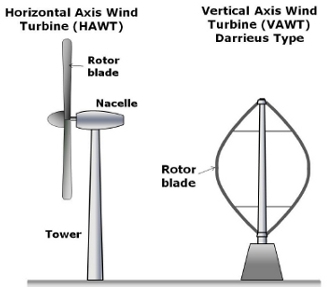
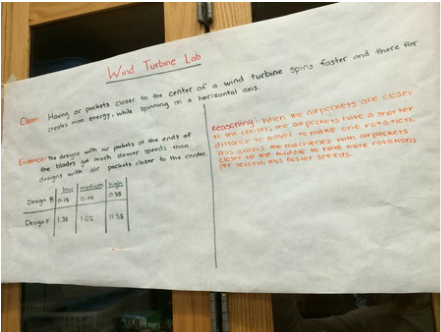
After studying solar energy, we began to research other energy sources, such as wind power. First we researched different turbine designs. We looked at images of vertical axis wind turbines (VAWTS) and horizontal axis wind turbines (HAWTS). After looking at different designs, we made small scale horizontal and vertical turbines in groups. We made seven different designs, varying from a metal pinwheel to propellers. We tested each design to see which would get the most voltage when faced with simulated wind. After testing all of our designs, we made a conclusion that having blades with air pockets closer to the center spins faster, and there for creates more energy, than blades with air pockets on the edge of the blades. We came to this conclusion after testing a variety of very different designs. Some had air pockets on the edges of the blades, while some had air pockets in the center. We noticed that the designs with air pockets in the center got up to a lot higher voltage. This is because when the pockets are closer to the center, they ahve a shorter distance to travel around to make one rotation. This allows these designs to have more rotations per second, and more voltage.
Client Needs Survey
After learning all of that information, we could start researching how to use it in our school. We would be designing and building an outdoor classroom that wouldn't require electricity. We would use what we knew about sun angles to provide the right amount of shade suring the different times of day and year. To figure out what our school wanted though, we conducted a survey for the staff and students at our school. It asked what they wanted the name, location, included materials to be, etc. A variety of students of different grade levels and different teachers took the survey. This gave us a better picture of what the community wanted in an outdoor classroom space. to see the survey results click here:
Material Testing
When brainstorming what materials to use for our classrooms, we ran in to the question of which materials absorb heat the best, and which materials absorb water. To test the water saturation of the different materials, we first weighed the objects, then poured the same amount of water on each object, and every five minutes recorded the weight to see how much water weight was added and how long it took for the object to return to it's original weight. We also tested each material to see how long it took to be dry to the touch.
For the heat test, We took the temperature of the object, then we put the different materials under heat lamps, and after five minutes recorded the temperature. We then turned off the lamps and recorded the temperature every five minutes to see how long each material took to return to it's original temperature.
To see the results of the heat conductivity lab, click here:
Site Selection
To find the best location for our classroom, we went around our campus to look at the different sites that had good natural shade, ground quality, and little wind. We found three different spots, but concluded that one location between two buildings would be the best. It was already mostly shaded, the wind was being blocked by the surrounding buildings, and there was already a foundation there. You can see where the location is in relation to the campus in the slide show below.
Final Product
Now that we knew what the school wanted, the best materials, and where to build, we could start designing our classroom. We decided to have two pergolas and six desks in two rows of three. We would use pressure treated wood for the pergola, and discarded pallets for the desks. Although the pergolas only covered four of the desks, the shade from the pergolas covered all of the desks. The ground would have chicken wire to keep out gophers and squirells, ground cloth the keep out the weeds, and finally wood chips on top for a good stable material that dries quickly. The estimated cost would be less than the budget. To see the slideshow with all of the specific information scroll down.
Reflection
I learned a lot from this project. I learned how important detailed research is. I also learned that you have to think of everything, every possible problem. You have to make sure that no matter what, your product can still work. I had to do a lot of research on the best materials, and how to build certain things, or where the best place to get materials is, or how materials are affected based on where you are. How the climate effects things.
Pits: Since the project was so long, and we spent so much time researching and designing, on some days our group was distracted and there was not a lot of work accomplished. Some days were hard to concentrate and stay on task, which effected how much time we had to spend working on it. Since some days weren't as productive we had to rush our work a little bit on the last few days. We also didn't spend enough time on our presentation. We didn't practice it enough.
Peaks: We accomplished a lot as a group. We were able to make 3-D models, graphs, and physical models of our pergolas. We made sketches of the desks. We made a detailed materials and costs list. We made a presentation, wind turbines, and water heater. Although some days weren't as productive, we still got everything that needed to be done, done. I also took more of a leadership roll during this project, which I have been working on doing. I tried my best to make sure everyone was working on something. I researched a lot of the information and sugested what others could research.
I learned a lot from this project, and hope that continue to grow, both in knowledge and in experience. I am happy with the turn out, and can't wait for the next project.
